Wondering what to do with your old turntable? Well with this detailed guide we are going to tell you how to properly calibrate it and use it once again with a killer sound! All you need for this tutorial is a turntable in a decent shape that you can get from your basement, garage sales or somewhere on over the internet. It’s cheap, fast and the restoration is easy!
Requirements
So we guess that you already have a turntable in a decent shape. Now you’ll need to get the guide for it and that part which has a needle on it – the cartridge. You will also need a 2mm wrench, ruler, magnifying glass, a good lamp or a flashlight, needle-nose pliers and a printout of a normal cartridge ruler.
If the turntable has been unused for a long time you should probably upgrade your cartridge. Be sure, to spend good money for this part, because it is absolutely responsible for the quality of the sound that you are going to receive. Don’t worry, new cartridges that are of high quality cost no more than a hundred dollars. After that it is from huge importance to take a look at your variables.
There are 3 variables – Cartridge Alignment, Tracking Pressure and Anti-Skating. These are the three most important things that you should calibrate. Of course, some more sophisticated turntables have many other options for adjustment, but these are the 3 that are a complete must.
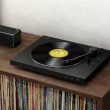
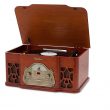
Your old turntable probably looks like this.
Tracking Pressure
Firstly, we are going to check the Tracking Pressure. This is the weight on the back of your tonearm. It is used to control the pressure on the styles and it tracks the grooves. Before doing this check the instructions and do it step by step. If you can’t find your manual, check google by typing your model.
- Make contact with the red, blue, green & white wire, when you start to install the brand new cartridge, to the marked holes on the cartridge’s backside. Tighten with pliers if it is too lose, you don’t want it to move too much. The last step is to screw it into the head shell. You won’t need help with this one.
- The back of the arm should take the weight until the tonearm floats on it’s own and before that set the anti-skating dial to zero.
- Now check your Cartridge manual and adjust the weight to the gram specified, if it’s a range then put it on the middle!
Cartridge Alignment
- You will need the manual for this one as well, so pick it up and screw the cartridge into the head shell’s slots as it is shown.
- The alignment protractor must be placed on the platter. Next step is to drop the stylus tip onto the first point. You have to aim to make that part, which is metal, down from the cartridge as it is shown in the guidelines. Now loosen the screws located in the head shell and shake it a bit back and forth, but be careful.
- It is time for the magnifying glass and the flashlight to come in handy, because the space isn’t much!
- Now the first point should match perfectly. The next point is the same because it’s calculated to be that way. If it isn’t, move things until it’s all fine.
Anti-Skating
This is one of the easiest parts -Turn the anti-skating knob in order for it to match the tracking pressure. Make it about 250 milligrams or a bit less for bigger accuracy!
All you have to do is study this tutorial and your turntable will turn into a killer sounding machine. When you work with it keep it on a sturdy place and don’t forget to clean it frequently by buying cheap tools. This will help the turntable to sound better, like a Martin Doyle Flute(Shoutout!)